Mar 31, 2017
This lesson covers three easy ways to implement some form of acceleration in your Arduino sketches.
It will cover the following:
- Linear Acceleration
- Exponential Acceleration
- Messing Around with the Square Root function

What is Acceleration?
Acceleration is the rate of change of something over time. Acceleration would help describe things like:
- Have fast can a stopped car get to 88mph?
- If I do a wing-suit jump from the top of Mount Everest, how fast will I be when I am gliding over base camp?
- How can I gently slow down the movement of a mechanical servo before it comes to rest?
We can implement acceleration when programming Arduino quite easily with just a couple lines of code.
The basic concept is that a variable will need to change - how it changes over the course of the sketch is what we are interested in. Below are three examples of how we can code change in variables so they display acceleration.
Linear acceleration
Linear acceleration is a constant rate of change. It can be represented by a sloped line on an x-y axis.
A simple way to use it is to increment or decrement a variable every time through a loop like below...
for (int i = 0; i < 10; i++) { //accel gets increasingly smaller as for loop continues accel = accel - 100; }//close for
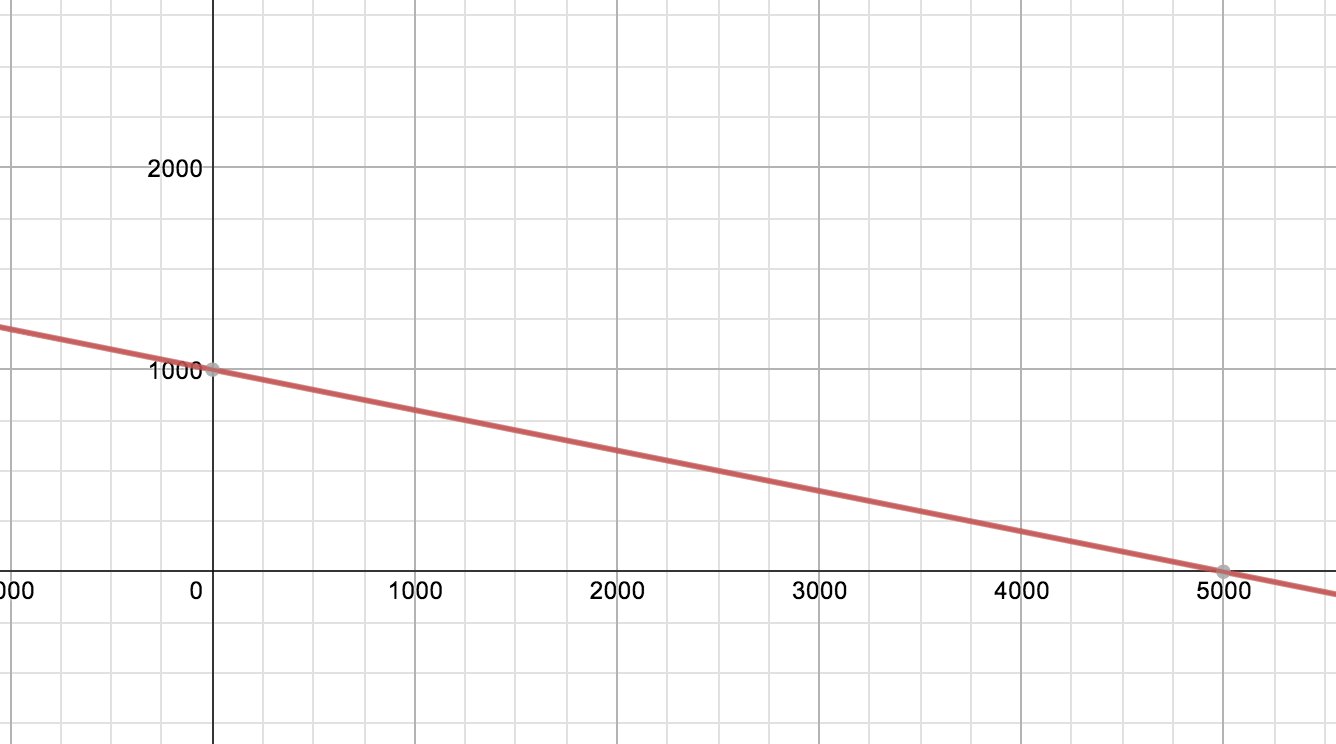
You can see in the code above, that each time through the 'for loop', the accel variable is decreasing by 100. If accel started at 1000, this is what accel would look like with respect to the number of iterations of the for loop.
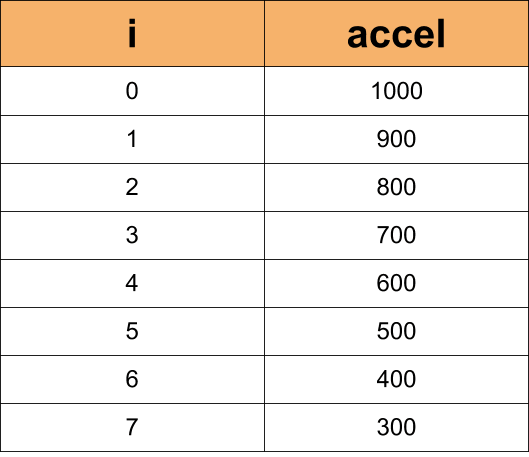
You can see that the accel variable decreases at a set rate over time in a linear fashion.
Exponential Acceleration
Exponential acceleration changes over time too, but it does so more dramatically (It's basically a drama queen). At first the rate of change in the variable is small, but once it begins to increase it really takes off!
You can use the power function built into the Arduino IDE to make a variable change exponentially. The power function syntax is quite easy.
pow( base, exponent )
The parameter base is the number that get raised to the power of the exponent. Like 2 to the 5th power. Below is an example of how you might code it to change a variable exponentially over the course of a 'for loop'.
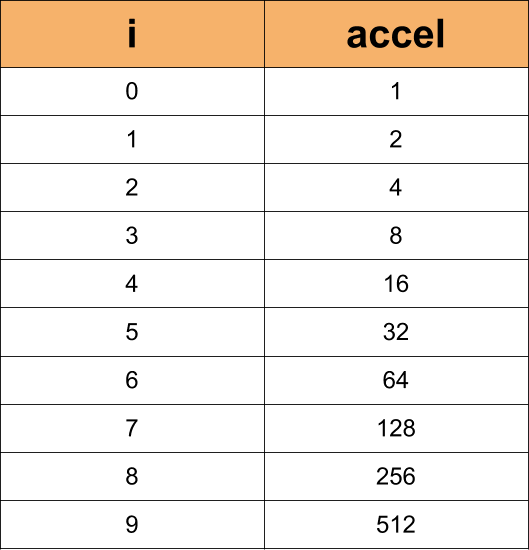
for (int i = 0; i < 10; i++) { //accel grows exponentially as the for loop continues accel = pow(2, i); }//close for
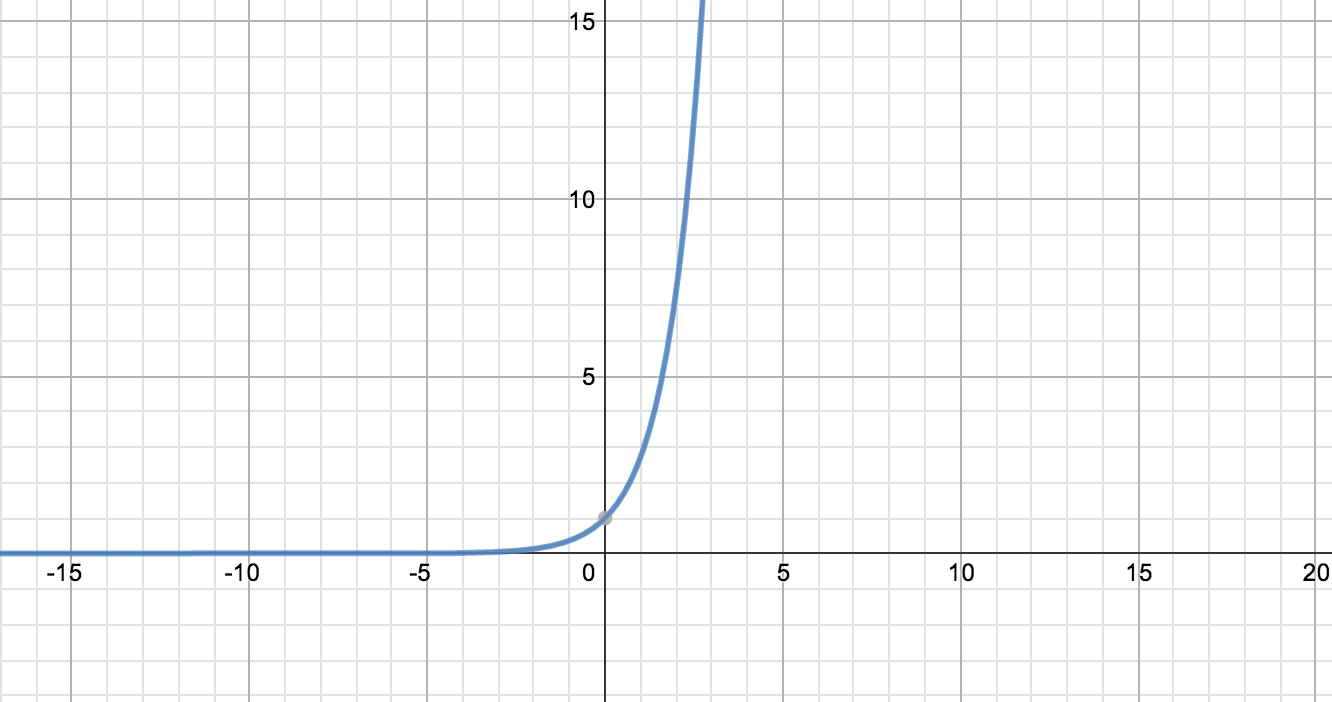
Looking at a chart of accel over the course of the 'for loop', we can see that the way it changes is much different than linear acceleration:
The theme for exponential growth is that is starts out slow, but once it starts going it really get's going!
Using the Square Root Function for Acceleration
The square root function can also provide some flavor to the output from your Arduino. It's syntax is simple:
sqrt( x )
It returns the square root of the number or variable that you put in the parenthesis. Below is an easy way to use it in a 'for loop':
for (int i = 0; i < 6; i++) { //accel quickly decreases through the loop accel = sqrt(accel); }//close for
Let's look at how accel changes over the course of the for loop(let's say it started at 10,000):
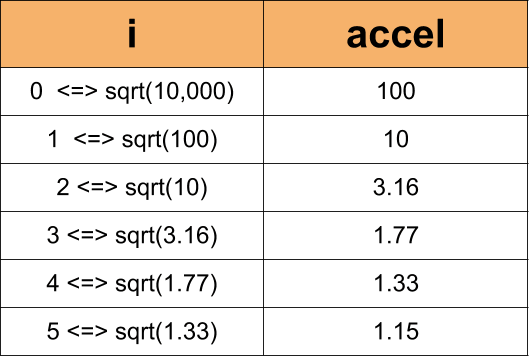
You can see the a rapid deceleration in the value of the accel variable of the 'for loop'.
Practice With Acceleration:
If you want to take a look at what these types of acceleration will do in "real" life, then set up the circuit below.
You Will Need:
- (10) LEDs
- (10) 220 Ohm Resistors
- (1) Jumper Wire
- Arduino Board
- Bread Board
- Black Marker
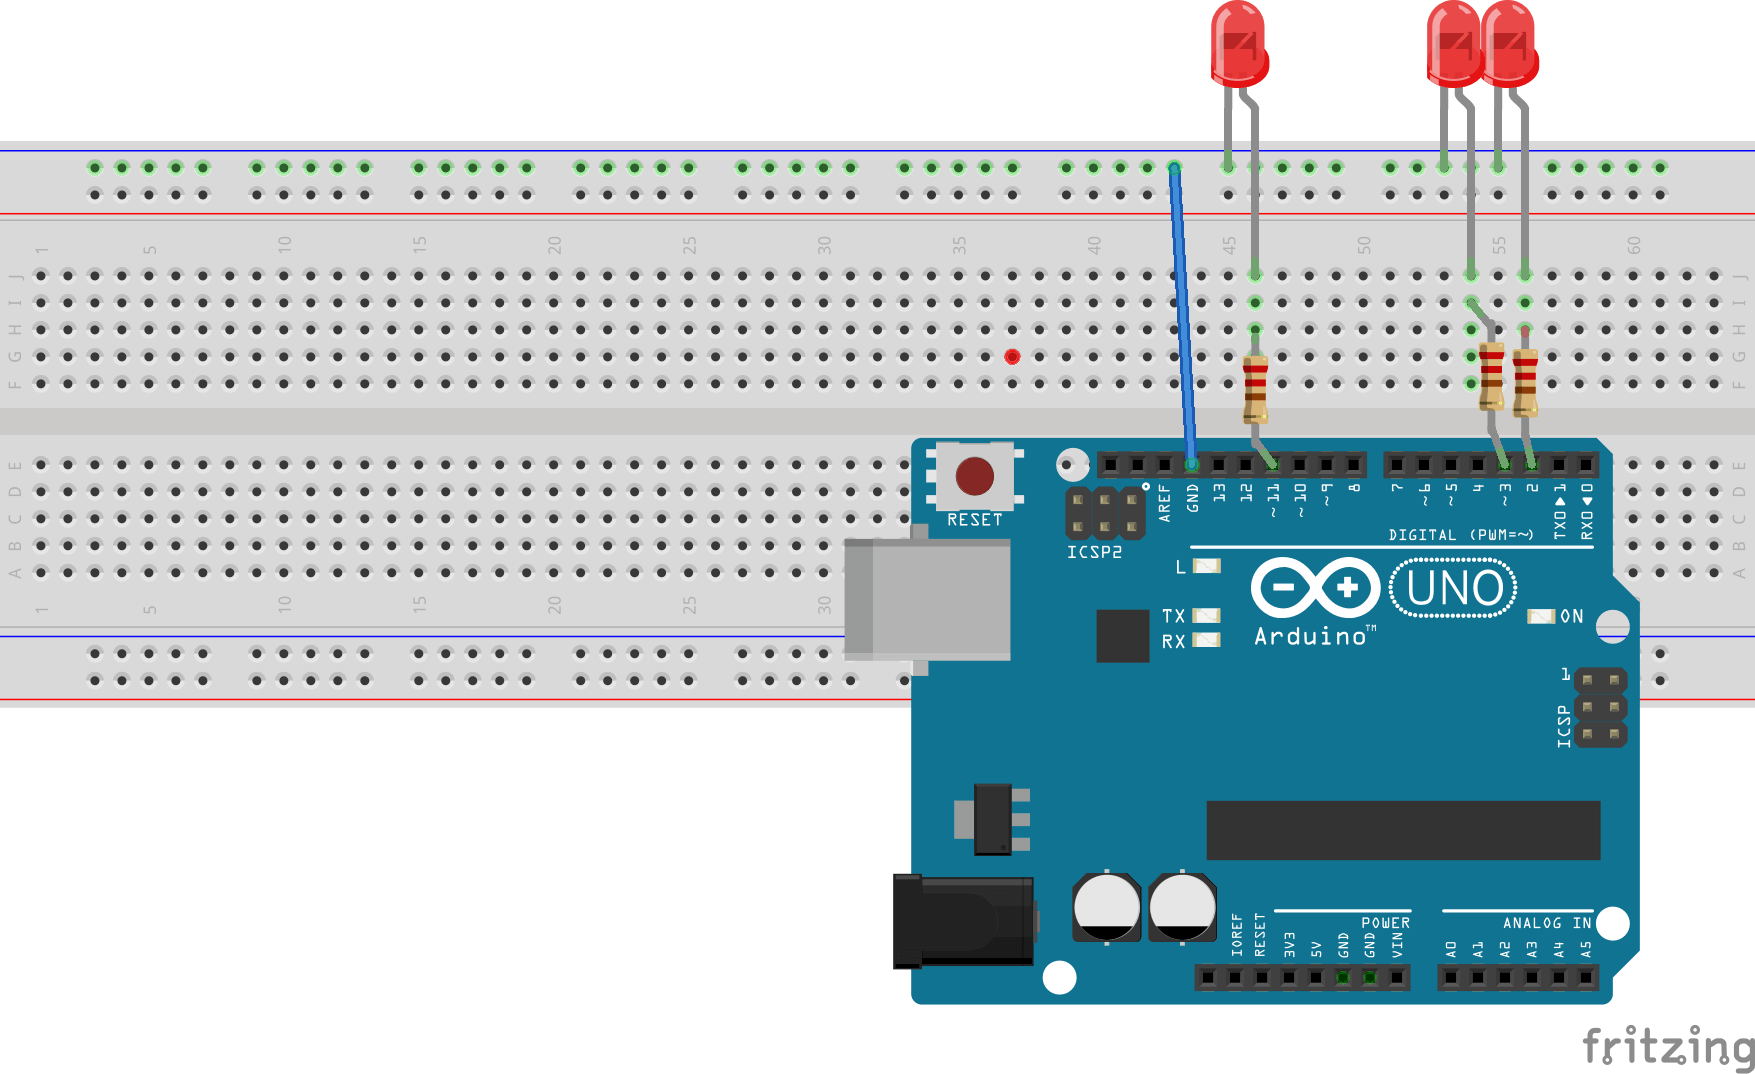
Set Up The Circuit:
Start by by placing one resistor at pin 2 on your Arduino. Connect the other end of the resistor to the breadboard and then connect the long leg of the LED to the resistor. Place the short leg of the LED in the outer ground rail of the bread board.

Then add 9 more resistors and LEDs across - you should stop at Pin 11 on the Arduino. Then add a jumper wire from GND on the Arduino to the shared ground on the breadboard. (All LEDs not pictured).
That is pretty much it for the circuit. Below are the code examples for the different ways to program acceleration that we talked about:
Here is the code for the linear acceleration:
/* Linaer ( Constant ) Acceleration The circuit: * LEDs from pins 2 through 11 to ground created 2006 by David A. Mellis modified 30 Aug 2011 by Tom Igoe Modifeid 21 Jul 2014 by Michael James This example code is in the public domain. http://www.arduino.cc/en/Tutorial/Array */ //Declare and initialize variables // The higher the number, the slower the timing. int timer = 1000; // an array of pin numbers to which LEDs are attached int ledPins[] = { 2, 3, 4, 5, 6, 7, 8, 9, 10, 11 }; // the number of pins (i.e. the length of the array) int pinCount = 10; void setup() { // the array elements are numbered from 0 to (pinCount - 1). // use a for loop to initialize each pin as an output: for (int thisPin = 0; thisPin < pinCount; thisPin++) { pinMode(ledPins[thisPin], OUTPUT); } //Start Serial Communication Serial.begin(9600); }//close setup void loop() { // loop from the lowest pin to the highest: for (int thisPin = 0; thisPin < pinCount; thisPin++) { // turn the pin on: digitalWrite(ledPins[thisPin], HIGH); delay(timer); // turn the pin off: digitalWrite(ledPins[thisPin], LOW); //decrement timer (EASY WAY) timer = timer - 100; //let's take a look at the numbers via the serial monitor window (Tools > Serial Monitor) Serial.print("Back ... LED #"); Serial.print(thisPin); Serial.print(" = "); Serial.println(timer); }//close for //reset timer for next for loop timer = 1000; // loop from the highest pin to the lowest: for (int thisPin = pinCount - 1; thisPin >= 0; thisPin--) { // turn the pin on: digitalWrite(ledPins[thisPin], HIGH); delay(timer); // turn the pin off: digitalWrite(ledPins[thisPin], LOW); //decrement timer timer = timer - 100; //let's take a look at the numbers via the serial monitor window (Tools > Serial Monitor) Serial.print("Forth ... LED #"); Serial.print(thisPin); Serial.print(" = "); Serial.println(timer); }//close for //reset timer for next for loop timer = 1000; }//close loop
Here is the code for the exponential acceleration:
/* Exponential Acceleration The circuit: * LEDs from pins 2 through 11 to ground created 2006 by David A. Mellis modified 30 Aug 2011 by Tom Igoe Modifeid 21 Jul 2014 by Michael James This example code is in the public domain. http://www.arduino.cc/en/Tutorial/Array */ //Declare and initialize variables // The higher the number, the slower the timing. float timer = 1000; // an array of pin numbers to which LEDs are attached int ledPins[] = { 2, 3, 4, 5, 6, 7, 8, 9, 10, 11 }; // the number of pins (i.e. the length of the array) int pinCount = 10; void setup() { // the array elements are numbered from 0 to (pinCount - 1). // use a for loop to initialize each pin as an output: for (int thisPin = 0; thisPin < pinCount; thisPin++) { pinMode(ledPins[thisPin], OUTPUT); } //Start Serial Communication Serial.begin(9600); }//close setup void loop() { // loop from the lowest pin to the highest: for (int thisPin = 0; thisPin < pinCount; thisPin++) { // turn the pin on: digitalWrite(ledPins[thisPin], HIGH); delay(timer); // turn the pin off: digitalWrite(ledPins[thisPin], LOW); //decrement timer timer = pow(2, thisPin); //let's take a look at the numbers via the serial monitor window (Tools > Serial Monitor) Serial.print("Back ... LED #"); Serial.print(thisPin); Serial.print(" = "); Serial.println(timer); }//close for //reset timer for next for loop // loop from the highest pin to the lowest: for (int thisPin = pinCount - 1; thisPin >= 0; thisPin--) { // turn the pin on: digitalWrite(ledPins[thisPin], HIGH); delay(timer); // turn the pin off: digitalWrite(ledPins[thisPin], LOW); //decrement timer timer = pow(2, thisPin); //let's take a look at the numbers via the serial monitor window (Tools > Serial Monitor) Serial.print("Forth ... LED #"); Serial.print(thisPin); Serial.print(" = "); Serial.println(timer); }//close for //reset timer for next for loop timer = 1000; }//close loop
Here is the code for messing around with the square root:
/* square root The circuit: * LEDs from pins 2 through 11 to ground created 2006 by David A. Mellis modified 30 Aug 2011 by Tom Igoe Modifeid 21 Jul 2014 by Michael James This example code is in the public domain. http://www.arduino.cc/en/Tutorial/Array */ //Declare and initialize variables // The higher the number, the slower the timing. float timer = 1000; // an array of pin numbers to which LEDs are attached int ledPins[] = { 2, 3, 4, 5, 6, 7, 8, 9, 10, 11 }; // the number of pins (i.e. the length of the array) int pinCount = 10; void setup() { // the array elements are numbered from 0 to (pinCount - 1). // use a for loop to initialize each pin as an output: for (int thisPin = 0; thisPin < pinCount; thisPin++) { pinMode(ledPins[thisPin], OUTPUT); } //Start Serial Communication Serial.begin(9600); }//close setup void loop() { // loop from the lowest pin to the highest: for (int thisPin = 0; thisPin < pinCount; thisPin++) { // turn the pin on: digitalWrite(ledPins[thisPin], HIGH); delay(timer); // turn the pin off: digitalWrite(ledPins[thisPin], LOW); //decrement timer timer = sqrt(timer); //let's take a look at the numbers via the serial monitor window (Tools > Serial Monitor) Serial.print("Back ... LED #"); Serial.print(thisPin); Serial.print(" = "); Serial.println(timer); }//close for //reset timer for next for loop timer = 1000; // loop from the highest pin to the lowest: for (int thisPin = pinCount - 1; thisPin >= 0; thisPin--) { // turn the pin on: digitalWrite(ledPins[thisPin], HIGH); delay(timer); // turn the pin off: digitalWrite(ledPins[thisPin], LOW); //decrement timer timer = sqrt(timer); //let's take a look at the numbers via the serial monitor window (Tools > Serial Monitor) Serial.print("Forth ... LED #"); Serial.print(thisPin); Serial.print(" = "); Serial.println(timer); }//close for //reset timer for next for loop timer = 1000; }//close loop
I hope the lesson was helpful. The idea of adding acceleration to a sketch can seem a bit intimidating at first, but as you can see, it turns out to be a rather simple addition of code.
Try on Your Own Challenge:
- Can you make the fade amount of an LED accelerate/deccelerate?
- Can you add a potentiometer to the circuit above and find a way to control the amount of acceleration - either linear, exponential or otherwise.