Mar 25, 2017
You Will Need:
- The Arduino IDE installed and an Arduino connected to your computer.
Discussion:
In this lesson, we're going to be talking about programming syntax. We'll be introducing some of the basic programming syntax that you'll be using every time you write a sketch.
Specifically, we'll be talking about:
- what programming syntax is
- comments
- the semicolon
- keywords
- function syntax
- layout & indentation
Programming Syntax
What is programming syntax? I like to use this analogy. You can think of programming syntax like the punctuation and grammar of computer programming.
If you've ever read a book, then you're probably really familiar with written punctuation and grammar. For example, in the written word, we use things such as periods, commas, dashes, or semicolons.
Languages also have verbs, nouns, diphthongs, and all types of crazy grammar that goes with them. The punctuation and grammar that you're familiar with are tools that help us communicate effectively with one another in the written word.
Commas convey a pause. Periods let us know a sentence has ended. Italics and bold text let us know if a word is emphasized. When we're communicating to another person, these are tools that help us do so.
Just as written sentences require correct grammar and punctuation to be correct, the same is true for programming languages.
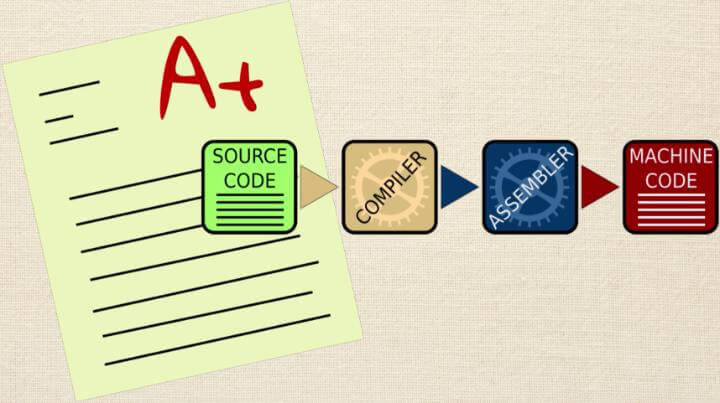
However, with programming, in most cases we're communicating with the compiler - the compiler being the program that looks at our code and creates machine language for us.
The programming syntax that we use is meant to communicate our intent to the compiler program. For this reason, the programming syntax MUST be correct.
You can get away with messing up some grammar and punctuation when you're writing to a friend or an audience. They'll probably understand what your intent is.
On the other hand, if you make an error in your programming syntax, there's almost assuredly going to be an issue. You’ll have either a compiler error when you go to compile the code or a subtle and hard to find bug in the actual operation of your sketch.
When you start out, you'll likely find that getting all the program syntax correct is a major hassle. It just doesn't feel natural, and the compiler is far more exacting than most “red pen crazy” elementary school teachers.
The good news is that as you get more comfortable in the programming language, the syntax will come more naturally to you. It will become second nature as you write your code.
Comments
Let's start with one of the most important tools in programming - the comment. Comments are descriptive statements that a programmer writes to help explain the code.
They are syntax and punctuation that really have nothing to do with the compiler. In fact, the whole purpose of a comment is so that you can hide these words from the compiler.
There are two ways to create a comment. The first is the single line comment, which uses a double forward slash. It looks like this:
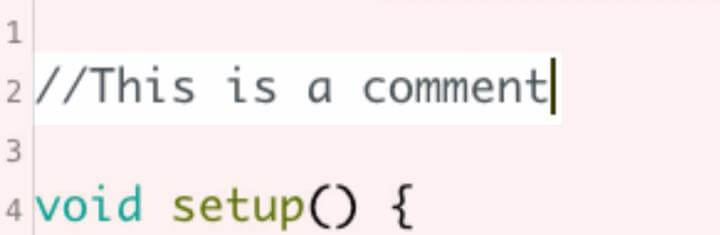
Notice that all the text after the double forward slash is grayed out.
If you have a lot to say, then you can use a multi-line comment. To start a multi-line comment, you type a forward slash followed by an asterisk. Now you can type multiple lines of comments.
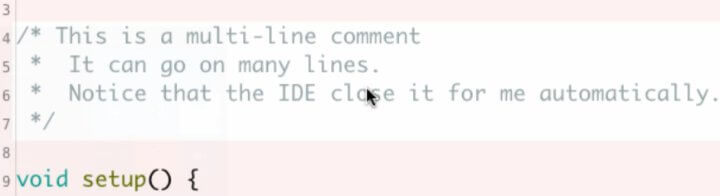
You'll notice that they're all grayed out. Also, when you press the enter key after that first line, the Arduino IDE actually auto closes the comment for you. It is closed with an asterisk and another forward slash.
These additional asterisks on the lines in between are not required, but they are added by the Arduino IDE. These help the multi-line comment stand out from the rest of the code.
As I said, comments are hidden from the compiler. They are words specifically for any other person reading your code - not the computer.
I won't go into the substance of comments right now. You'll learn more about what comments should say as you work through the course, but I will say that comments should be descriptive statements explaining what that part of the code will do.
Semicolons
The next thing I want to talk about is the semicolon. The semicolon is to the C++ programming language as the period is to the English language.
A semicolon lets the compiler know that a specific statement of computer code is complete. Let's take this line of code:
 .
.
I know right now this code means nothing to you, but what I want you to see is the semicolon at the end. This semicolon lets the compiler know that your next line of code is independent from the previous one.
If you wanted, you could move the semicolon to the next line of code or even insert spaces. It wouldn't make a difference. However, this is horrible form.
You really should keep your semicolon on the same line of code that it ends. I just wanted to point this out to demonstrate that the compiler will ignore the spaces before and after a semicolon.
If you forget to type a semicolon and then compile your sketch, you may get several different types of errors. I took out the semicolon from the previous line of code and compiled the code using the verify button. I then get an error.
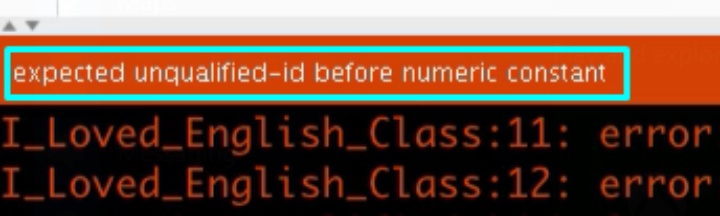
The message bar says, “expected unqualified id before numeric constant”. What does that mean? Well, let's look down into the error and see what it actually says.

If we look through these error messages, we can see that it's referring to the name of the program and the line of code - line 12. Then it says, “expected comma or semicolon before void”.
If we look back up to line 12, it says, “void”. It's saying that it expected a comma or a semicolon. Now we can trace back our steps to that particular line of code and put in a semicolon.

If I compile it now, it will be successful.
In many cases, error codes are not very informative. Luckily, these are pretty descriptive. They tell you what line of code to look at, and they even tell you what you forgot. So it's pretty handy.
Keywords
You may have noticed that some of the words typed into the Arduino IDE automatically change color. These are called keywords.
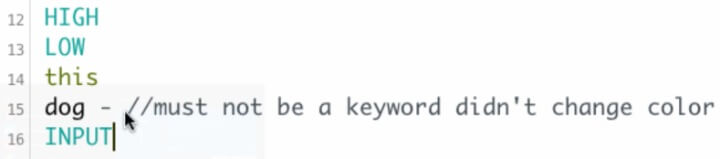
Keywords are specially designated terms in a programming language. They perform specific functions for us and are reserved to be used only for those functions.
You'll get very familiar with different keywords as you work through the course. Therefore, we won't give an in-depth description of every keyword in this module.
Remember, you'll know when you've typed a keyword because it will automatically change color.
Function Syntax
The next thing I want to talk about are functions. Keep in mind that this is a very cursory overview of functions. I want to give you just the gist of what a function does.
Functions are programming tools that package up frequently used pieces of code to make them easy to use.
Let's say, for example, that you had some code that did a calculation to convert degrees Celsius to degrees Fahrenheit. Maybe it was just a couple lines of code, but you found yourself using that code pretty frequently.
Instead of having to type that code into the program every time you wanted to do the calculation, you could turn it into a function.
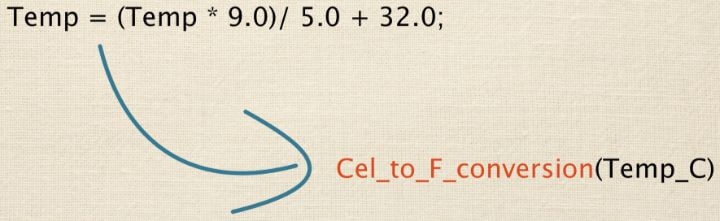
To use a function, all you have to do is write the name of the function. Then, give it some pieces of information so that it can do the job. For example, if it was a Celsius to Fahrenheit converter, you'd have to give it the temperature in Celsius, and it would give you back the value in Fahrenheit.

The Arduino language has tons of built-in functions, and, just like keywords, they also change color automatically when you type them.
Functions are kind of like the verbs of a programming language. They make things happen, and they do stuff for us.
The real reason I brought up functions isn't because I want to explain how they work. We'll be learning, in detail, about all different types of functions throughout the course. What I really want to talk about is function syntax.
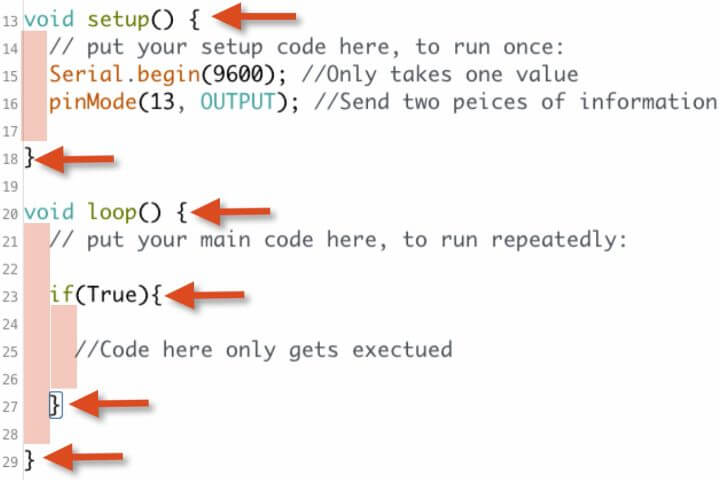
All functions are followed by an opening and closing parenthesis. Inside these parentheses is where you give the function what it needs to perform its task. If the function needs multiple pieces of information, those items are separated by commas.
Some functions don't take any data, but they still must have a pair of parentheses. Also, every open parenthesis MUST have a closing parenthesis.
Notice when I put my cursor on an opening parenthesis that the closing parenthesis is highlighted.

Likewise, if I put my cursor by the closing parenthesis, the opening parenthesis is highlighted. This can be a handy tool to determine if you've actually closed the parenthesis after you opened it, or vice versa.
Some functions, called control structures, have opening and closing curly brackets following the parentheses. The code that goes between these opening and closing curly brackets will get executed under different circumstances.
Just as with parentheses, every open curly bracket must have a closing curly bracket. Furthermore, just like parentheses, if you put your cursor by one of the curly brackets, it will highlight the partner of that curly bracket.
Layout & Indentation
You may have also noticed that there is indentation in these lines of code. Indentation doesn't communicate anything at all to the compiler, but it helps the author of the code - as well as anyone else reading it- navigate through what’s been written.
As a general rule of thumb, when you're writing code inside opening and closing curly brackets of a control structure, the code is indented two spaces from the rest of that code. Then, that indentation continues if a new set of curly brackets is opened up.
Another tool for indenting is the “Auto Format” tool in the Arduino IDE. Simply go up to “Tools” at the top of the screen, and then choose “Auto Format”. You could also just press command T.
This will automatically create the correct layout for you. It’s much easier to use than manually indenting, and it keeps your code from looking sloppy.
Review
We talked about what programming syntax is. It’s like punctuation and grammar for computer programming languages. We talked about comments, both single line and multi-line.
We also talked about the semicolon and how it's like the period of a sentence for the C++ programming language.
Next, we discussed the automatic coloring of keywords and about function syntax. Finally, we talked about layout indenting.
That's it for this lesson. Again, this was just a cursory overview. Don't worry about memorizing every little thing and about whether or not you understood the coding shown. That's not the expectation right now.
Really we just want to get our eyes inside the Arduino IDE and start understanding some of the basics - symbols being used and what some of the coloring and layout mean. I look forward to seeing you in the next lesson.
Try On Your Own Challenge:
- Type the following code (exactly how it is typed), into the Arduino IDE. Remember - the compiler program will not accept errors - so don't get angry if you see a couple spur up the first time around - it is just part of the learning experience. When you are done, Verify the code by pressing "Control + r", you should not get any errors.
-
//Type this into your Arduino IDE *EXACTLY* how it is typed here. //Don't worry about what the program does - this is about practicing the syntax. //This is a single line commment - What color is the text here? //Will the complier *see* these comments? /* This is a mutli-line comment. Will the compiler see these words? Are these multi-line comments colored different than single line comments? */ String dog; //Which of these words is a keyword? How do you know? //Setup only runs once. void setup() { //notice that setup() has a different color. // Comments are meant to explain your code to you and other people. //Set up Serial Communication. Serial.begin(9600); //This is the color of a library function }//This curly bracket "closes" the setup function. // Put your main code here, to run repeatedly: void loop() { //This curly bracket opens the loop() function. //Assign a bark to the dog. dog = "bark"; //Send the dog bark to the computer. Serial.println(dog); //Upload this code to the Arduino (CONTROL + U) and open the Serial Monitor Window (SHIFT + CONTROL + M) } //This curly bracket closes the loop() function.